Installation & Setup Guide
Welcome to ROXAS AI! This guide walks you through setting up a clean Python environment, installing the napari-roxas-ai plugin, and configuring optional hardware GPU acceleration for fast deep-learning inference.
System Requirements & Prerequisites
| Component | Minimum Specification | Recommended Specification |
|---|---|---|
| Operating System | Windows 10/11 (64-bit), macOS 12+ (Monterey or later), Linux (Ubuntu 20.04+, Debian, Fedora, Arch) | Windows 11 (64-bit), macOS 14+ (Sonoma/Sequoia), or modern Linux x86_64 |
| Processor Architecture | x86_64 (64-bit Intel/AMD) or ARM64 (Apple Silicon M-Series, Linux aarch64) | 8+ CPU cores (Intel Core i7/i9, AMD Ryzen 7/9, Apple Silicon) |
| Python Version | Python 3.10 | Python 3.12 (strongly recommended) |
| System Memory (RAM) | 8 GB RAM | 16 GB to 32 GB RAM (recommended for large gigapixel wood anatomy scans) |
| Disk Space | ~2 GB free disk space | 5+ GB free space (for conda environments, deep-learning model weights, and sample data) |
| Graphics (GPU) (Optional) | CPU-only processing supported | Dedicated NVIDIA GPU (\(\ge\) 6 GB VRAM, RTX 20/30/40/50 series), Apple Silicon (M1–M4), or Intel Arc GPU |
Step 1: Install a Package Manager & Open Terminal
We strongly recommend installing Miniforge (community-driven, pre-configured with the fast conda-forge channel) or Miniconda to manage your Python environment.
- Download the installer:
- Miniforge (Recommended): Download the Miniforge Windows 64-bit Installer.
- Miniconda (Alternative): Download the Miniconda Windows 64-bit Installer.
- Run the installer: Follow the standard setup wizard. We recommend installing for "Just Me" into the default directory.
- Open the prompt:
- Open the Windows Start menu and search for Miniforge Prompt (or Anaconda Prompt if using Miniconda).
- Alternatively, if you use Windows Terminal or PowerShell and initialized Conda, open your standard terminal.
- Run all subsequent installation commands inside this prompt.
- Download the installer:
- Apple Silicon (M1/M2/M3/M4): Download Miniforge3-MacOSX-arm64.pkg or the Miniconda Apple Silicon Installer.
- Intel Macs: Download Miniforge3-MacOSX-x86_64.pkg or the Miniconda Intel Installer.
- Run the installer package and follow the prompts.
- Alternative (Command-line installation via Terminal):
curl -L -O "https://github.com/conda-forge/miniforge/releases/latest/download/Miniforge3-MacOSX-$(uname -m).sh" bash Miniforge3-MacOSX-$(uname -m).sh - Open Terminal: Open
Applications > Utilities > Terminal.
- Download and run the installer in Terminal:
- x86_64 (64-bit Intel/AMD):
wget https://github.com/conda-forge/miniforge/releases/latest/download/Miniforge3-Linux-x86_64.sh bash Miniforge3-Linux-x86_64.sh - ARM64 / aarch64:
wget https://github.com/conda-forge/miniforge/releases/latest/download/Miniforge3-Linux-aarch64.sh
bash Miniforge3-Linux-aarch64.sh
- x86_64 (64-bit Intel/AMD):
- Follow the installer prompts and answer
yeswhen asked to initialize Conda for your shell. - Close and reopen your Terminal window to activate Conda.
Step 2: Create & Activate the Environment
Create a dedicated, clean Python 3.12 environment named roxas-ai and activate it:
conda create -n roxas-ai python=3.12 -y
conda activate roxas-ai
Always activate your environment
Whenever you open a new terminal session to run ROXAS AI, make sure to activate the environment first:
conda activate roxas-ai
Step 3: (Optional) GPU Acceleration
While ROXAS AI functions fully on CPU, enabling GPU acceleration significantly speeds up deep-learning instance segmentation for wood anatomical cells and tree ring boundaries on large, high-resolution scans.
By default, standard PyPI wheels install a CPU-only build of PyTorch on Windows and Linux. To leverage your NVIDIA GPU:
-
Install CUDA-enabled PyTorch:
This command installs PyTorch with CUDA 12.8 runtime support, fully compatible with modern NVIDIA GPUs (RTX 20-, 30-, 40-, and 50-series / Blackwell, Ada Lovelace, Ampere, and Turing architectures). The CUDA runtime is bundled with the PyTorch wheels; you only need an up-to-date NVIDIA display driver installed.pip install torch torchvision --index-url https://download.pytorch.org/whl/cu128(Note: If your system uses older NVIDIA drivers that cannot be updated, install the CUDA 12.6 build instead by replacing
cu128withcu126). -
Verify GPU / CUDA availability:
For a functional GPU installation,python -c "import torch; print('CUDA available:', torch.cuda.is_available()); print('CUDA version:', torch.version.cuda); print('GPU:', torch.cuda.get_device_name(0) if torch.cuda.is_available() else 'None')"CUDA available:should outputTrueand list your NVIDIA GPU model name. -
Troubleshooting: If
CUDA available:reportsFalseafter installation (e.g., if a CPU-only PyTorch build was previously cached or installed), cleanly remove PyTorch and reinstall with the explicit CUDA wheel index:pip uninstall torch torchvision torchaudio -y pip install torch torchvision --index-url https://download.pytorch.org/whl/cu128
(For supported AMD GPUs on Linux, consult the PyTorch ROCm installation guide).
Experimental
Intel GPU (XPU) acceleration in PyTorch is supported for Intel Arc A-Series and B-Series dedicated graphics cards, as well as Intel Core Ultra processors with integrated Arc graphics on Windows 11 and Ubuntu. See the PyTorch Intel GPU guide for detailed device support.
-
Install the Intel GPU driver: Download and install the latest graphics driver from Intel's website. No separate oneAPI base toolkit installation is required.
-
Install XPU-enabled PyTorch:
The version constraints ensure PyTorch remains within the range supported by ROXAS AI, preventing subsequent pip commands from replacing it with a CPU build.pip install "torch>=2.5,<2.9" "torchvision<0.24" --index-url https://download.pytorch.org/whl/xpu -
Verify XPU availability:
For a functional installation,python -c "import torch; print('XPU available:', getattr(torch, 'xpu', None) is not None and torch.xpu.is_available()); print('GPU:', torch.xpu.get_device_name(0) if getattr(torch, 'xpu', None) and torch.xpu.is_available() else 'None')"XPU available:should outputTrueand list your Intel GPU device name.
First run kernel compilation
On some Intel GPUs, the initial inference pass compiles GPU compute kernels, which can take several minutes with no terminal output. The compiled kernels are cached on disk, so subsequent runs start within seconds.
- Apple Silicon (M1 / M2 / M3 / M4): PyTorch leverages Apple's Metal Performance Shaders (MPS) backend natively. No additional CUDA or driver configuration is required. The standard PyTorch wheels installed with ROXAS AI automatically include MPS support.
To verify MPS availability in Terminal:
python -c "import torch; print('MPS available:', torch.backends.mps.is_available()); print('MPS built:', torch.backends.mps.is_built())"
MPS available: True is displayed, ROXAS AI automatically accelerates deep-learning segmentation using your Apple Silicon GPU.
- Intel-based Macs: GPU acceleration is not supported on Intel Macs; ROXAS AI will run automatically using the CPU.
Step 4: Install ROXAS AI
Install the latest released version of napari-roxas-ai via pip:
pip install napari-roxas-ai
pip install --upgrade napari-roxas-ai
If you are contributing to the plugin or testing bleeding-edge development branches:
git clone https://github.com/roxas-ai/napari-roxas-ai.git
cd napari-roxas-ai
pip install -e ".[testing]"
Step 5: Launch & Verify
1. Launch napari with ROXAS AI
Run the dedicated launcher command in your terminal:
napari-roxas
Why use napari-roxas?
- Instant Shortcuts: Installs all custom ROXAS AI keyboard and canvas navigation shortcuts (
W,A,S,D,Space, and nudging hotkeys) immediately upon startup. - Auto-docked Workflow: Opens and docks the Group - Manual Editing widget panel on the right sidebar, ready for immediate use.
- Duplicate Prevention: Manages dock widgets through the manifest to prevent accidental duplicate panels.
(Note: Starting with plain napari works as well; plugin shortcuts and widgets become active as soon as you open any ROXAS AI widget via Plugins > ROXAS AI).
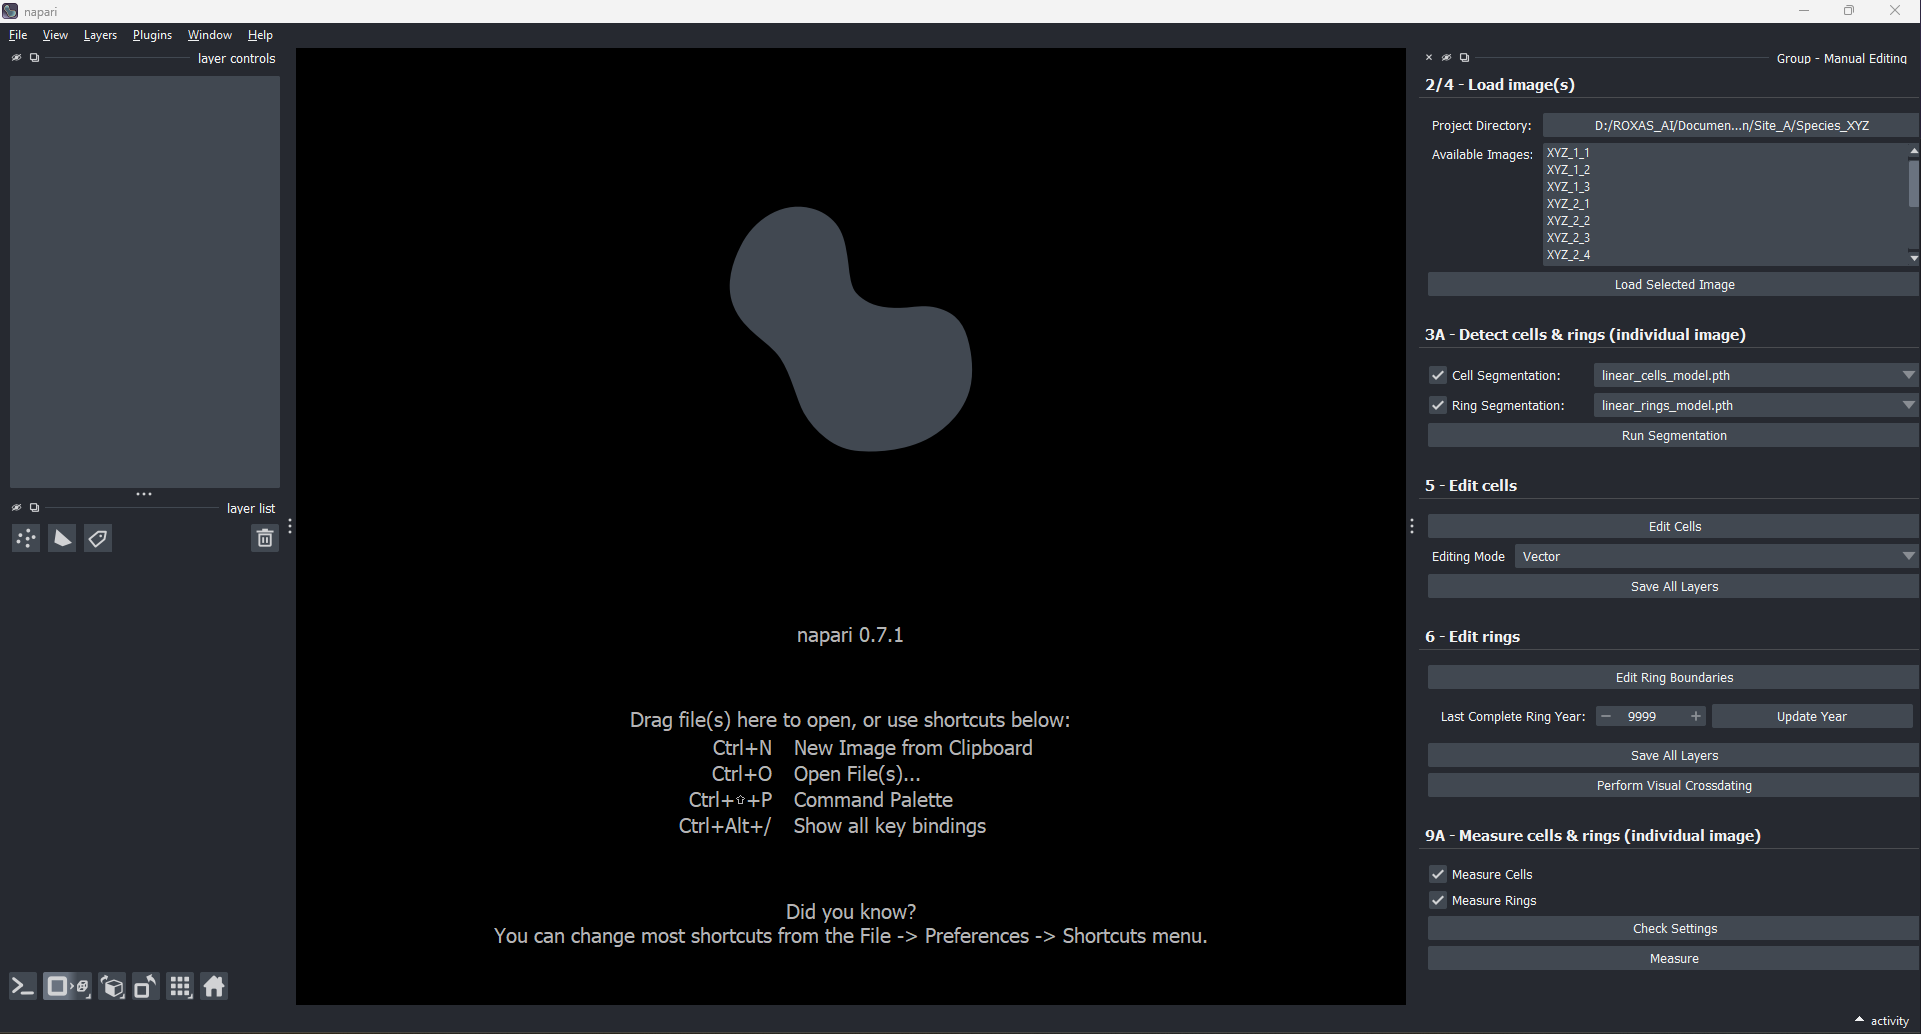
ROXAS AI workbench initialized in napari with the Manual Editing Group docked in the right sidebar.
2. Verify with Bundled Sample Data
- In the napari menu, navigate to
File > Open Sample > ROXAS AI. - The sample scan and its associated annotation layers will load into the viewer:
conifer_sample(Imagelayer): The raw high-resolution wood cross-section scan.conifer_sample.cells(Labelslayer): Labeled individual cell lumen instances.conifer_sample.rings(Labelslayer): Labeled annual tree-ring boundaries and ring bands.Rings Years(Pointslayer): Calendar year text labels dynamically positioned along each ring boundary.
Automatic Background Model & Asset Downloads
Pre-trained deep learning neural network weights (.pth files) and sample image assets are automatically downloaded from remote repositories in the background upon first access and cached locally in your user data directory for all subsequent sessions. Download progress is logged in the terminal.
3. Verify Hardware Acceleration in Settings
- In napari, open
Plugins > ROXAS AI > ZZ - Settings(or click the floating settings icon ⚙️ in the measurement widgets). - Expand the
processingsection. - Confirm that
try_to_use_gpuandtry_to_use_autocastare enabled (true). - Click
Apply. - Settings apply immediately across all open widgets without requiring a napari restart.
Summary Checklist
- [x] Miniforge / Miniconda installed and prompt opened.
- [x] Dedicated Python 3.12 environment created and activated (
conda activate roxas-ai). - [x] (Optional) GPU PyTorch installed and tested (
CUDA available: True,MPS available: True, orXPU available: True). - [x]
napari-roxas-aiinstalled viapip install napari-roxas-ai. - [x] Launched using
napari-roxasand loaded bundled sample data (File > Open Sample > ROXAS AI). - [x] Verified
try_to_use_gpuinPlugins > ROXAS AI > ZZ - Settings.
Important note on package installation
Never install or upgrade packages into the environment while napari or any Python script is actively running in it. Always close napari and execute package commands from a dedicated terminal prompt.
Troubleshooting & Clean Reinstall
1. PyTorch Uses CPU Despite Having an NVIDIA GPU
If PyTorch reports CUDA available: False or runs segmentation on CPU despite an NVIDIA GPU being present:
1. Ensure your NVIDIA graphics card driver is up to date via NVIDIA GeForce Experience or the NVIDIA Driver Downloads page.
2. Check if a CPU-only wheel of PyTorch was installed by another dependency. Reinstall the CUDA 12.8 wheel:
pip uninstall torch torchvision torchaudio -y
pip install torch torchvision --index-url https://download.pytorch.org/whl/cu128
2. Settings Not Updating or Corrupted Configuration
When upgrading napari-roxas-ai over an older installation, your customized settings.json file is preserved on disk to prevent overwriting user preferences. If you experience unexpected parameter behavior or schema mismatches:
- Reset via UI: In napari, open
Plugins > ROXAS AI > ZZ - Settingsand click Reset to defaults. - Manual Reset: Delete your local settings file to let ROXAS AI regenerate default settings on next launch:
- Windows:
%LOCALAPPDATA%\napari-roxas-ai\settings.json - macOS:
~/Library/Application Support/napari-roxas-ai/settings.json - Linux:
~/.config/napari-roxas-ai/settings.json
- Windows:
3. Linux GUI / Wayland Display Issues
On certain Linux distributions using Wayland display servers, Qt6 / napari may encounter rendering glitches or fail to start. If this occurs, force Qt to use X11/XCB:
export QT_QPA_PLATFORM=xcb
napari-roxas
4. Complete Clean Reinstallation
If you need to perform a completely fresh reinstallation:
1. Close napari and open your terminal with conda activate roxas-ai.
2. Uninstall the plugin:
pip uninstall napari-roxas-ai -y
pip install napari-roxas-ai
conda deactivate
conda env remove -n roxas-ai -y
conda create -n roxas-ai python=3.12 -y
conda activate roxas-ai
pip install torch torchvision --index-url https://download.pytorch.org/whl/cu128  # Optional GPU
pip install napari-roxas-ai